$ aws --version
aws-cli/1.16.204 Python/2.7.10 Darwin/18.7.0 botocore/1.12.194Ops Manager
Table of Contents
概述
本文档说明如何安装一个可用于生产的 MongoDB Ops Manager, 以及如何通过 Ops Manager 监控和警告的功能对一个 MongoDB 分片集群进行管理。具体内容包括:
-
MongoDB Ops Manager 4.1 安装
-
基本监控报警展示
-
HTTPS 配置
-
备份和 恢复
本部分操作可以在 AWS Linux 或 RHEL 7 上进行。如果所有操作在 AWS 上,所使用到的 AWS 服务包括:
-
EC2 - 运行 Ops Manager 及所需的组件、数据库等
-
Route 53 - 确保 EC2 节点之间可以通过域名访问
-
VPC - 确保 Ops Manager 及所需的组件在虚拟私有网络。
详细关于 EC2、Route 53、VPC 参照 AWS 相关文档及 说明。
确保 aws 命令行已安装,相关认证完毕,可以通过命令行执行命令启动,配置 EC2 等
MongoDB Ops Manager 安装

环境准备
如安装架构所示,准备三台服务器,相关配置如下
| 主机编号 | 域名 | CPU | 内存 | 磁盘 |
|---|---|---|---|---|
Host 1 |
host01.example.com |
4 |
16 GB |
80 GB |
Host 2 |
host02.example.com |
4 |
16 GB |
80 GB |
Host 3 |
host03.example.com |
4 |
16 GB |
80 GB |
AWS 上操作脚步(如果基于 RHEL 则忽略次步骤)
// set hostname
sudo hostnamectl set-hostname host01.example.com
sudo hostnamectl set-hostname host02.example.com
sudo hostnamectl set-hostname host03.example.com

// register a DNS A record hostname with private IP to Route 53
PRIVATEIPS="IP01 IP02 IP03"
HOSTNUM=1
for IP in $PRIVATEIPS
do
 export FQDN="host0$HOSTNUM.example.com"
 echo "Registering $host as $FQDN"
cat <<EOF> newhost0$HOSTNUM.json
{
  "Comment": "CREATE an A record ",
  "Changes": [{
    "Action": "UPSERT",
    "ResourceRecordSet": {
      "Name": "$FQDN",
      "Type": "A",
      "TTL": 300,
      "ResourceRecords": [{ "Value":"$IP"}]
    }
  }]
}
EOF
aws route53 change-resource-record-sets --hosted-zone-id XXXOOOZZZJJ --change-batch file://newhost0$HOSTNUM.json
let "HOSTNUM=HOSTNUM+1"
done

// check in 3 hosts, to make sure the DNS is work as expect, the referenced A record IP will list hints the DNS work as expected.
for i in 1 2 3 ; do dig host0$i.example.com +short ; done
分别在三台服务器上挂载磁盘,执行 MongoDB 生产部署配置
sudo mkfs -t xfs /dev/nvme1n1
sudo mkdir /data
sudo mount /dev/nvme1n1 /data
grep -q /dev/nvme1n1 /etc/fstab || echo "/dev/nvme1n1       /data          xfs     defaults,noatime   1  1" | sudo tee --append /etc/fstab
sudo findmnt --verify

grep -q 'vm.zone_reclaim_mode' /etc/sysctl.conf || echo "vm.zone_reclaim_mode=0
" | sudo tee --append /etc/sysctl.conf
sudo sysctl -w  vm.zone_reclaim_mode=0

grep -q 'vm.swappiness' /etc/sysctl.conf || echo "vm.swappiness=1" | sudo tee --append /etc/sysctl.conf
sudo sysctl -w  vm.swappiness=1

for limit in fsize cpu as memlock
do
  grep "mongodb" /etc/security/limits.conf | grep -q $limit || echo -e "mongod     hard   $limit    unlimited\nmongod     soft    $limit   unlimited" | sudo tee --append /etc/security/limits.conf
done

for limit in nofile noproc
do
  grep "mongodb" /etc/security/limits.conf | grep -q $limit || echo -e "mongod     hard   $limit    64000\nmongod     soft    $limit   64000" | sudo tee --append /etc/security/limits.conf
done

sudo reboot
安装 appDB
本部分在三个 host 上都执行。
1. 配置 yum 源(如果离线安装,可提前下载 rpm 包)
cat << 'ENDOFDOC' | sudo tee /etc/yum.repos.d/mongodb-enterprise.repo
[mongodb-enterprise]
name=MongoDB Enterprise Repository
baseurl=https://repo.mongodb.com/yum/amazon/2/mongodb-enterprise/4.0/$basearch/
gpgcheck=1
enabled=1
gpgkey=https://www.mongodb.org/static/pgp/server-4.0.asc
ENDOFDOC
2. 安装 MongoDB
sudo yum install -y mongodb-enterprise3. 创建数据库目录
sudo mkdir /data/appdb
sudo chown mongod:mongod /data/appdb
4. 创建配置文件
cat << 'ENDCONF' | sudo tee /etc/mongod.conf
# mongod.conf

# for documentation of all options, see:
#   http://docs.mongodb.org/manual/reference/configuration-options/

# where to write logging data.
systemLog:
  destination: file
  logAppend: true
  path: /data/appdb/mongod.log

# Where and how to store data.
storage:
  dbPath: /data/appdb
  journal:
    enabled: true
  wiredTiger:
    engineConfig:
       cacheSizeGB: 2


# how the process runs
processManagement:
  fork: true  # fork and run in background
  pidFilePath: /var/run/mongodb/mongod.pid  # location of pidfile
  timeZoneInfo: /usr/share/zoneinfo

# network interfaces
net:
  port: 27017
  bindIpAll: true

replication:
  replSetName: appdbRS
ENDCONF
NOET: 生产环境下最佳实践配置安全,启用内部认证。
5. 启动 MongoDB
sudo systemctl start mongod
sudo systemctl enable mongod
6. 初始化复制集
mongo -eval 'rs.initiate()'
mongo -eval 'rs.add("host02.mongosa.net:27017")'
mongo -eval 'rs.add("host03.mongosa.net:27017")'
Ops Manager 安装
$ curl -OL https://downloads.mongodb.com/on-prem-mms/rpm/mongodb-mms-4.0.16.50586.20191101T1422Z-1.x86_64.rpm
$ ls
mongodb-mms-4.0.16.50586.20191101T1422Z-1.x86_64.rpm
2. 安装
$ sudo yum localinstall mongodb-mms-4.0.16.50586.20191101T1422Z-1.x86_64.rpm -y3. 编辑 /opt/mongodb/mms/conf/conf-mms.properties,配置 appDB
mongo.mongoUri=mongodb://host01.example.com:27017,host02.example.com:27017,host03.example.com:27017/?maxPoolSize=150&replicaSet=appdbRS4. 启动 Ops Manager
$ sudo service mongodb-mms start5. 查看 Ops Manager HTTP 服务监听的端口
$ sudo netstat -antulop | grep 8080
tcp        0      0 0.0.0.0:8080            0.0.0.0:*               LISTEN      3258/mms-app         off (0.00/0/0)
Ops Manager 初始化配置
Ops Manager 安装成功后 HTTP 服务会启动,通过 HTTP 服务可以完成对 Ops Manager 初始化配置。
1. 访问 http://host02.example.com:8080 时,点击 Register 链接注册一个全局管理账户
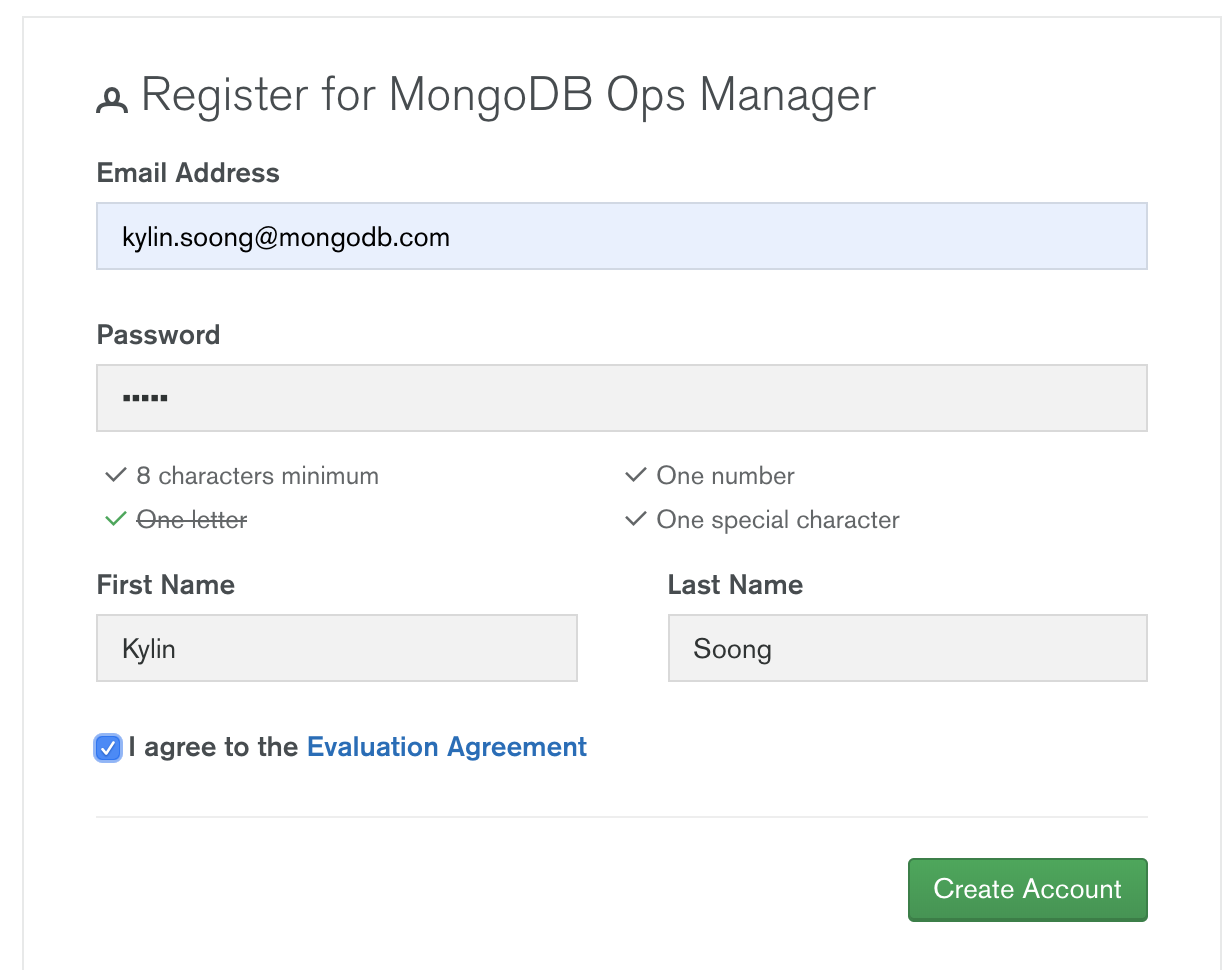
在弹出的页面配置如下:
-
Email Address : kylin.soong@mongodb.com
-
Password : password1!
-
First Name : Kylin
-
Last Name : Soong
2. 注册完成初次登陆会定向到 Configure Ops Manager 页面
在 Configure Ops Manager 页面完成初始化配置
-
Web Server
-
URL To Access Ops Manager - http://host02.example.com:8080
-
Client Certificate Mode - None
-
其它项使用默认配置
-
-
Email(本部分需要对接相关邮件服务器)
-
"From" Email Address - opsmanager@example.com
-
"Reply To" Email Address - admin@example.com
-
Admin Email Address - admin@example.com
-
Email Delivery Method Configuration - SMTP Email Server
-
Transport - smtp
-
SMTP Server Hostname - smtp.example.com
-
SMTP Server Port - 587
-
其它项使用默认配置
-
-
User Authentication
-
User Authentication Method - Application Database
-
其它项使用默认配置
-
-
Multi-Factor Authentication (MFA)
-
所有项使用默认配置
-
-
Other Authentication Options
-
所有项使用默认配置
-
-
Permissions
-
所有项使用默认配置
-
-
Backup Snapshots
-
所有项使用默认配置
-
-
Backup Snapshots Schedule
-
Snapshot Interval (Hours) - 24
-
Base Retention Of Snapshots (In Days) - 2
-
Daily Retention Of Snapshots (In Days) - No daily retention
-
Weekly Retention Of Snapshots (In Weeks) - 2
-
Monthly Retention Of Snapshots (In Months) - 1
-
其它项使用默认配置
-
-
KMIP Server Configuration
-
所有项使用默认配置
-
-
Queryable Snapshot Configuration
-
所有项使用默认配置
-
-
HTTP/HTTPS Proxy
-
所有项使用默认配置
-
-
Twilio Integration
-
所有项使用默认配置
-
-
MongoDB Version Management
-
所有项使用默认配置
-
-
Alerts
-
所有项使用默认配置
-
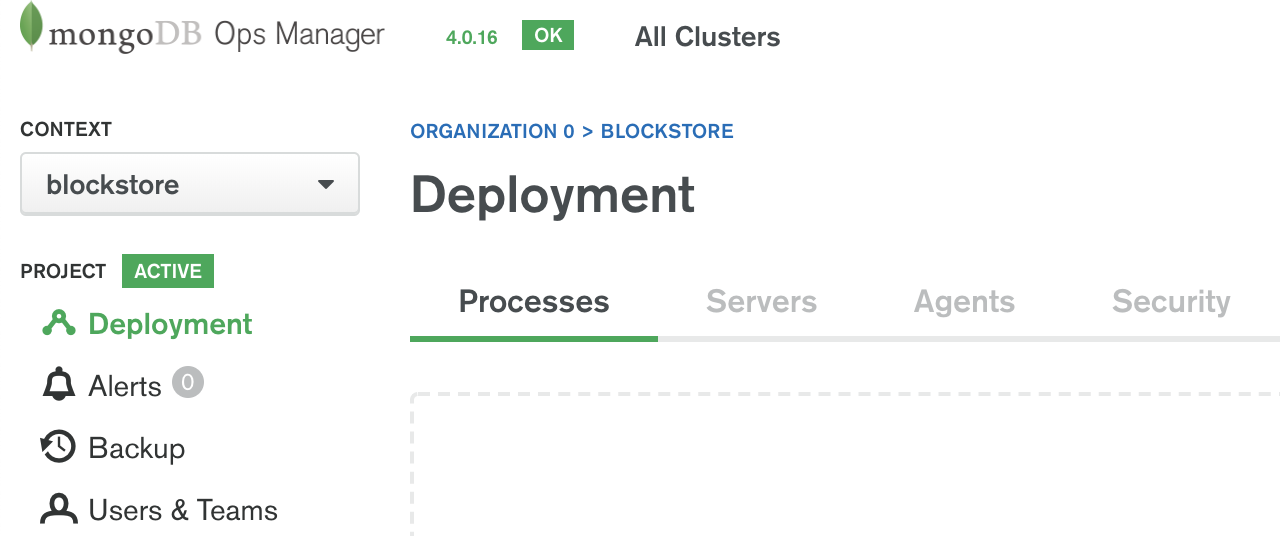
配置完成后进入到如下Deployment 界面
Agent 安装
|
Note
|
在 Ops Manager 新版本中 Agent 不需要手动安装,本部分可以跳过。 |
安装 Automation Agent
|
Note
|
Automation Agent 可以在需要部署导入时安装 |
在 Ops Manager 界面,选择 Deployment → Agents → Downloads & Settings,选择相应的版本,例如 Automation Agent Installation Instructions,在弹出的界面根据步骤完成 agent 安装。
1. 安装
$ curl -OL http://opsmgr.example.com:8080/download/agent/automation/mongodb-mms-automation-agent-manager-5.4.19.5537-1.x86_64.rhel7.rpm

$ sudo chmod a+x mongodb-mms-automation-agent-manager-5.4.19.5537-1.x86_64.rhel7.rpm
$ sudo yum localinstall mongodb-mms-automation-agent-manager-5.4.19.5537-1.x86_64.rhel7.rpm
2. 配置 key
sudo vi /etc/mongodb-mms/automation-agent.config3. 启动服务
sudo systemctl start mongodb-mms-automation-agent.service|
Note
|
部署界面有 安装 agent 的介绍。 |
安装 Monitoring Agent
|
Note
|
可以在创建完 Project 后执行这部分。 |
在 Ops Manager 界面,选择 Deployment → Agents → Downloads & Settings,选择相应的版本,例如 Install or Update the Monitoring Agent。
1. 安装
curl -OL http://opsmgr.example.com:8080/download/agent/monitoring/mongodb-mms-monitoring-agent-6.6.2.466-1.x86_64.rhel7.rpm

chmod 777 mongodb-mms-monitoring-agent-6.6.2.466-1.x86_64.rhel7.rpm

sudo yum localinstall mongodb-mms-monitoring-agent-6.6.2.466-1.x86_64.rhel7.rpm -y
2. 配置 key, 用户名,密码
sudo vi /etc/mongodb-mms/monitoring-agent.config

mmsGroupId=5d08a1af8a49a31b324ec641
mmsApiKey=5d08a41a8a49a31b324ec86d3dd0a7d168167e4fdb7ec454c450666b
mmsBaseUrl=http://opsmgr.example.com:8080

globalAuthUsername=mms-monitoring-agent
globalAuthPassword=mongo
3. 启动服务
sudo systemctl start mongodb-mms-monitoring-agent.service创建 MongoDB HA Blockstore
MongoDB Ops Manager 支持的数据备份选择包括:
-
文件系统 + SAN
-
文件系统 + NAS
-
AWS S3 Blockstore
-
MongoDB HA Blockstore
-
MongoDB Blockstore
关于不同的备份选择的优缺点参照 官方翁当,本部分选择 MongoDB HA Blockstore。
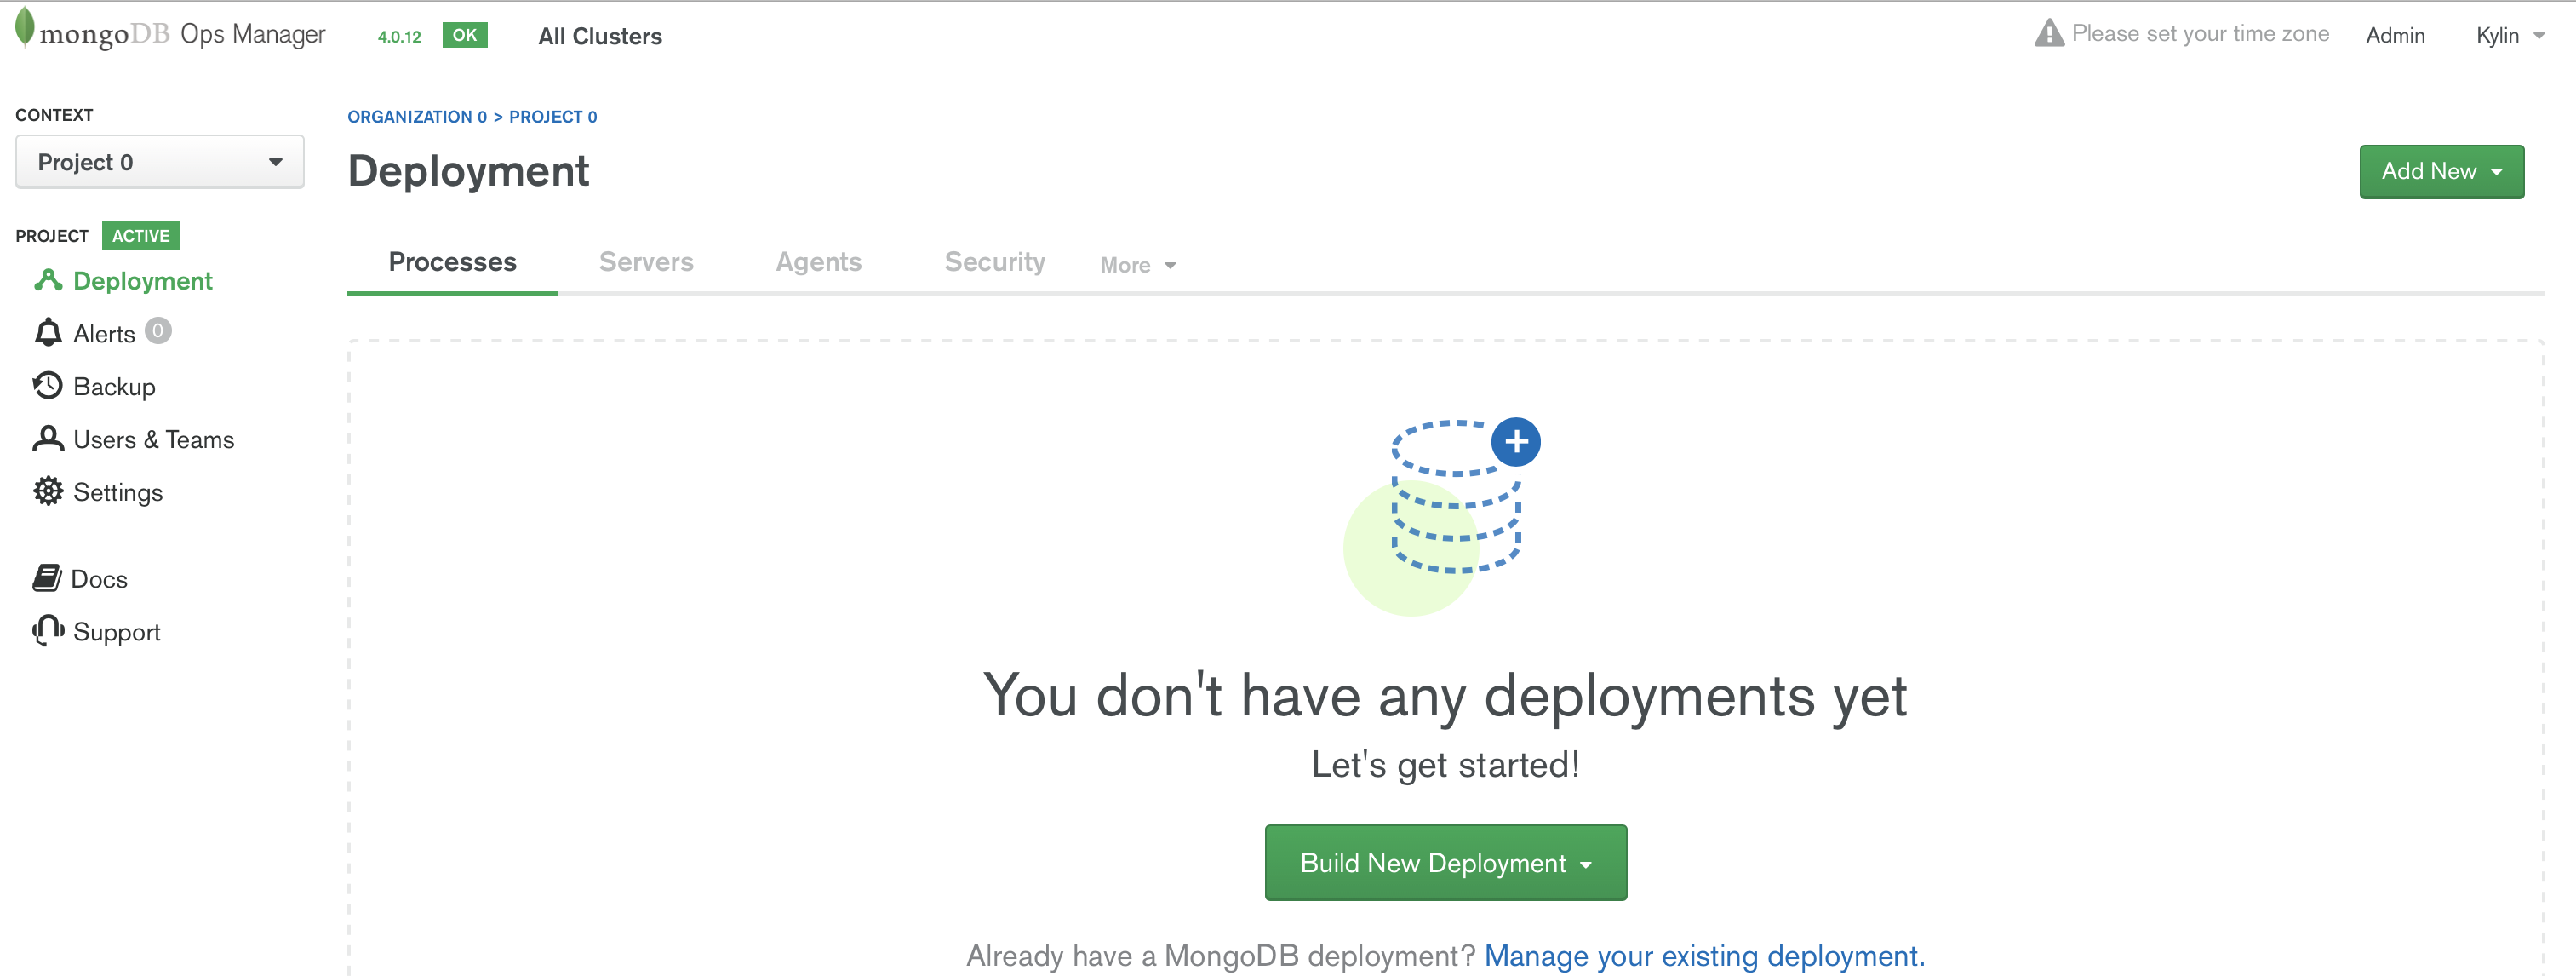
首先在 Ops Manager 创建一个 Project `blockstore'
然后在这个工程下创建一个 MongoDB 三节点复制集,分别运行在三个 Host 上,监听的端口都是 27018:
host01.example.com:27018,host02.example.com:27018,host03.example.com:27018Backup 配置
要开启 Ops Manager 的备份功能,需要完成 Backup 配置。Backup 配置主要包括:
-
HEAD DB - HEAD DB 中的数据和生产部署中的数据一致,它根据 快照策略,周期性生成快照。配置包括 HEAD 目录等。
-
Blockstore - 使用上面步骤准备的 MongoDB HA Blockstore,具体配置包括连接 URL,认证等
1. 在 Ops Manager 的安装 Host 上创建一个 HEAD 目录
sudo mkdir /data/heads
sudo chown mongodb-mms:mongodb-mms /data/heads
2. Backup Initial Configuration
在 Ops Manger 右上角点击 Admin,在最左边导航栏选择 Backup,在弹出界面中 Head Directory 输入框中输入 /data/heads
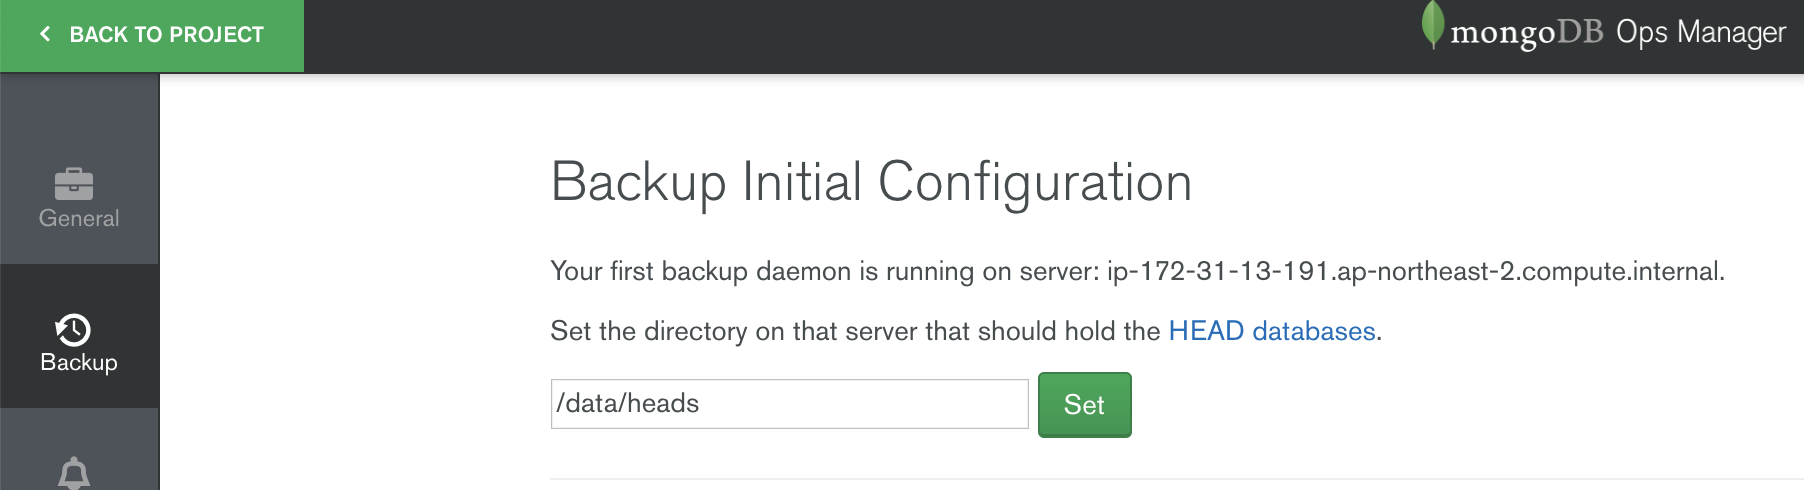
点击 Set 按钮,然后继续点击 Enable Daemon 按钮,

在弹出的界面上选择 Configure a Blockstore,然后在 <hostname>:<port> 输入
host01.example.com:27018,host02.example.com:27018,host03.example.com:27018配置完其他输入项后点击 Save 完成 Backup 配置。
备份
备份一个集群
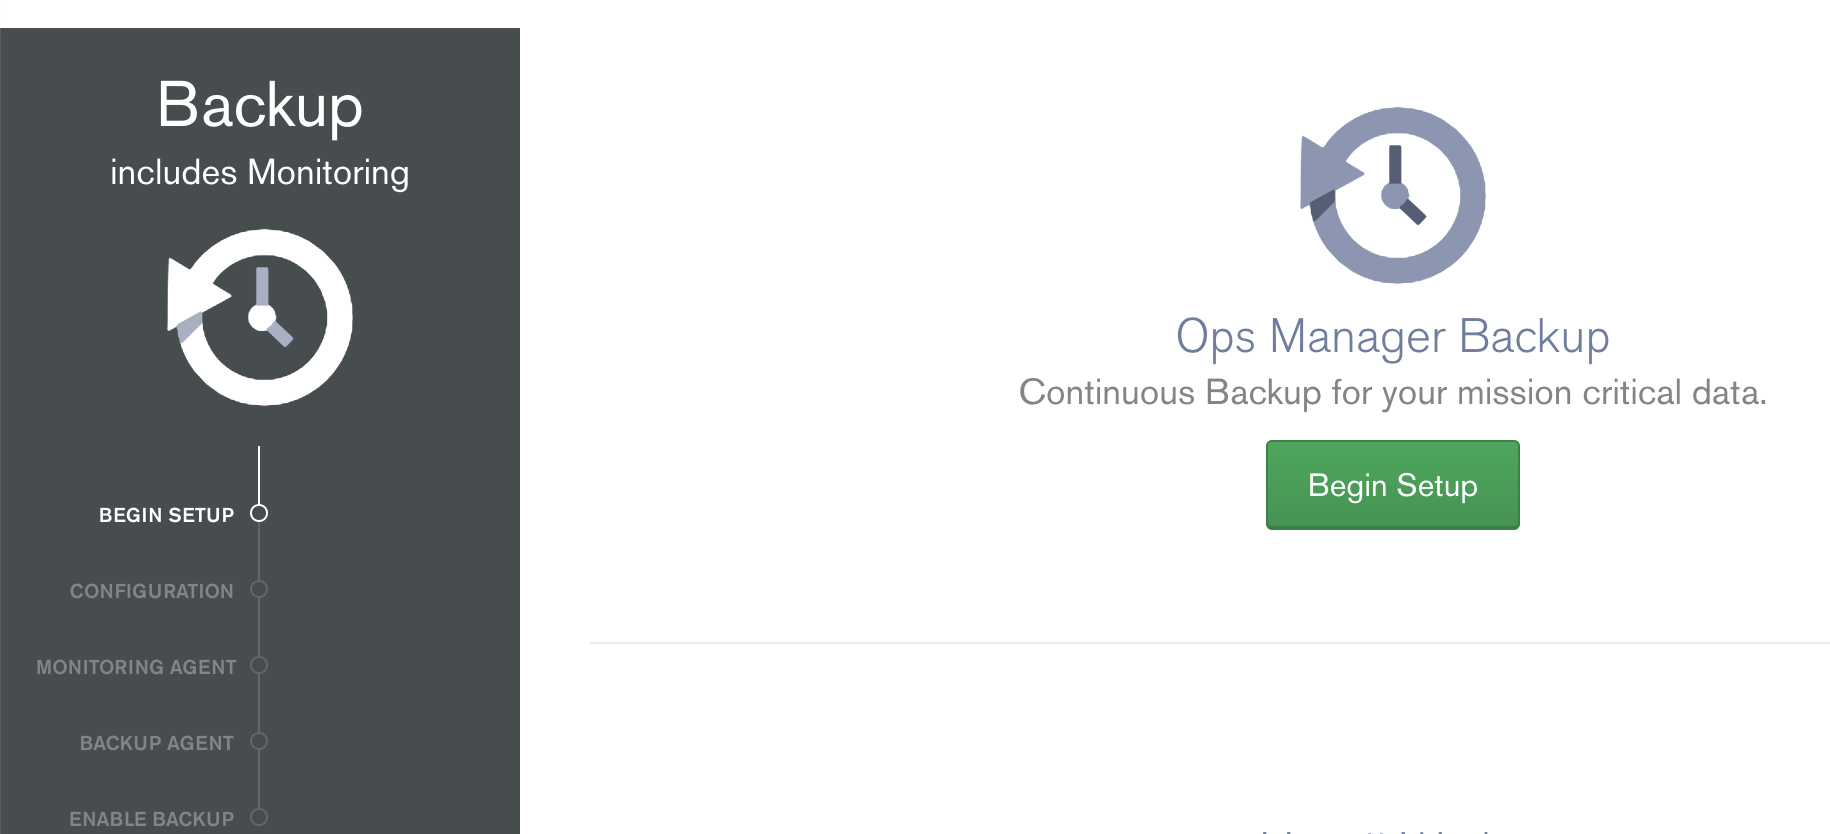
1. 点击 Backup
-
在 Ops Manager 控制台点击左边 Backup,进入 Backup 配置界面
-
点击 Begin Setup 按钮开始备份一个集群
-
点击 Next 按钮进入 Configration 界面开始配置备份
-
点击 Next 按钮进入 Monitor Agent 验证
-
点击 Next 按钮进入 Backup Agent 验证
-
点击 Next 按钮进入 Enable Backup 界面
导入一个存在的集群
本部分将上面步骤创建的测试集群导入到 Ops Manager.
创建 clusterMonitor 用户
在集群中的所有分片复制集,ConfigServer 复制集合中执行如下命令创建一个 clusterMonitor 用户
db.createUser({user: "mms-monitoring-agent", pwd: "mongo", roles: [{ role:"clusterMonitor", db: "admin" }]})|
Note
|
mms-monitoring-agent/mongo 用户会被 Monitor Agent 导入集群时使用
|
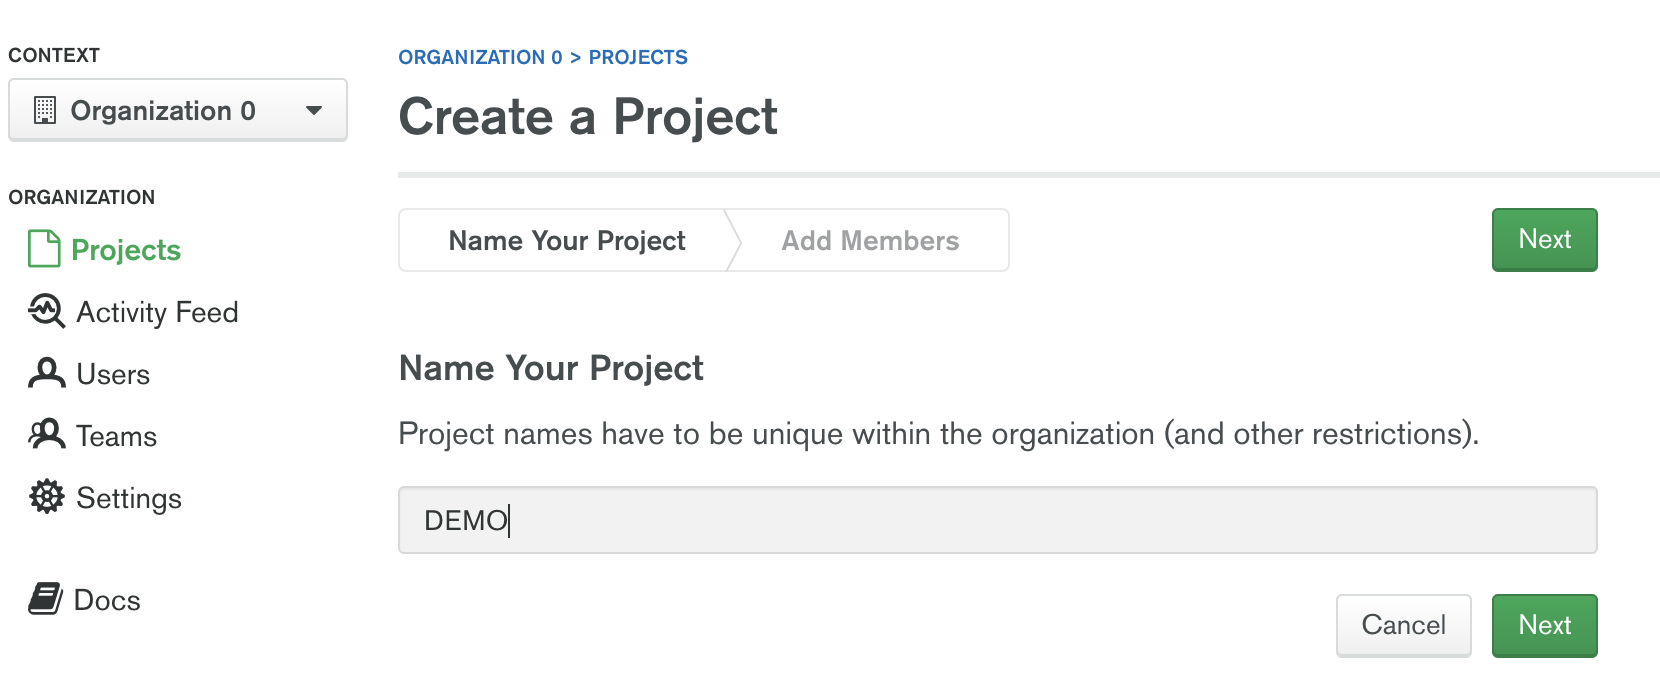
创建一个 Project
在 Ops Manager 界面创建一个 DEMO project
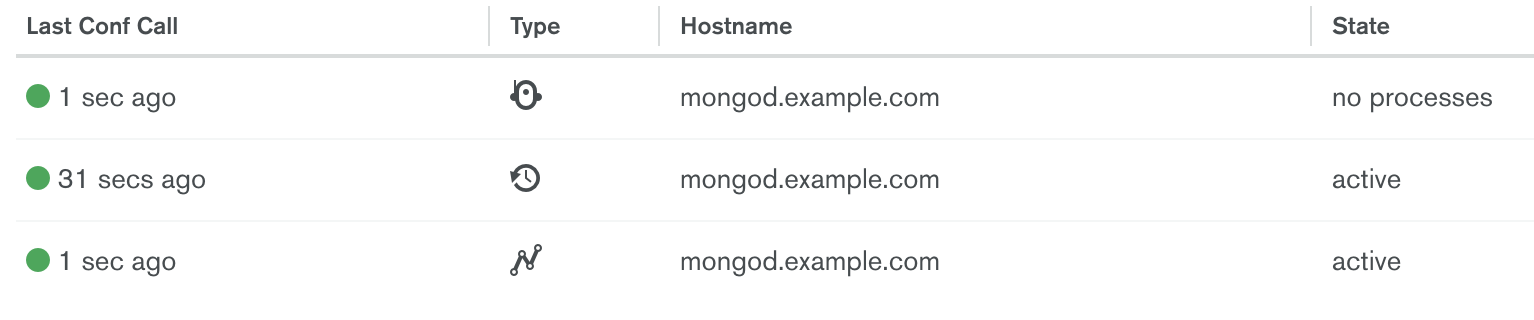
从 Ops Manager 界选择 Deployment → Agents → All Agents 下列表中可看到对应 Agent
|
Note
|
如上显示导入成功后 Project 对应所有 Agent,可执行完后回过头查看。 |
执行导入
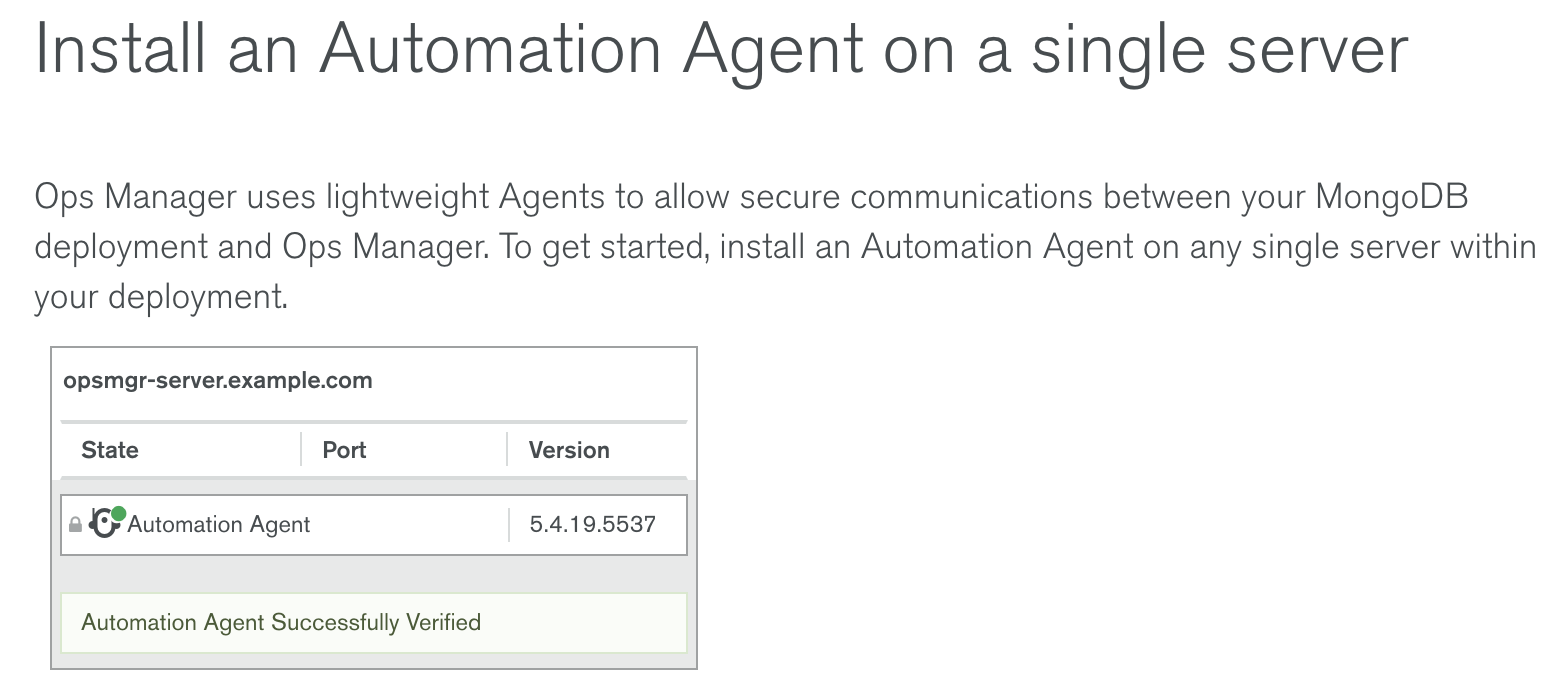
在 Ops Manager 界面 DEMO Project 下选择 Deployment → Add New → Existing MongoDB Deployment

-
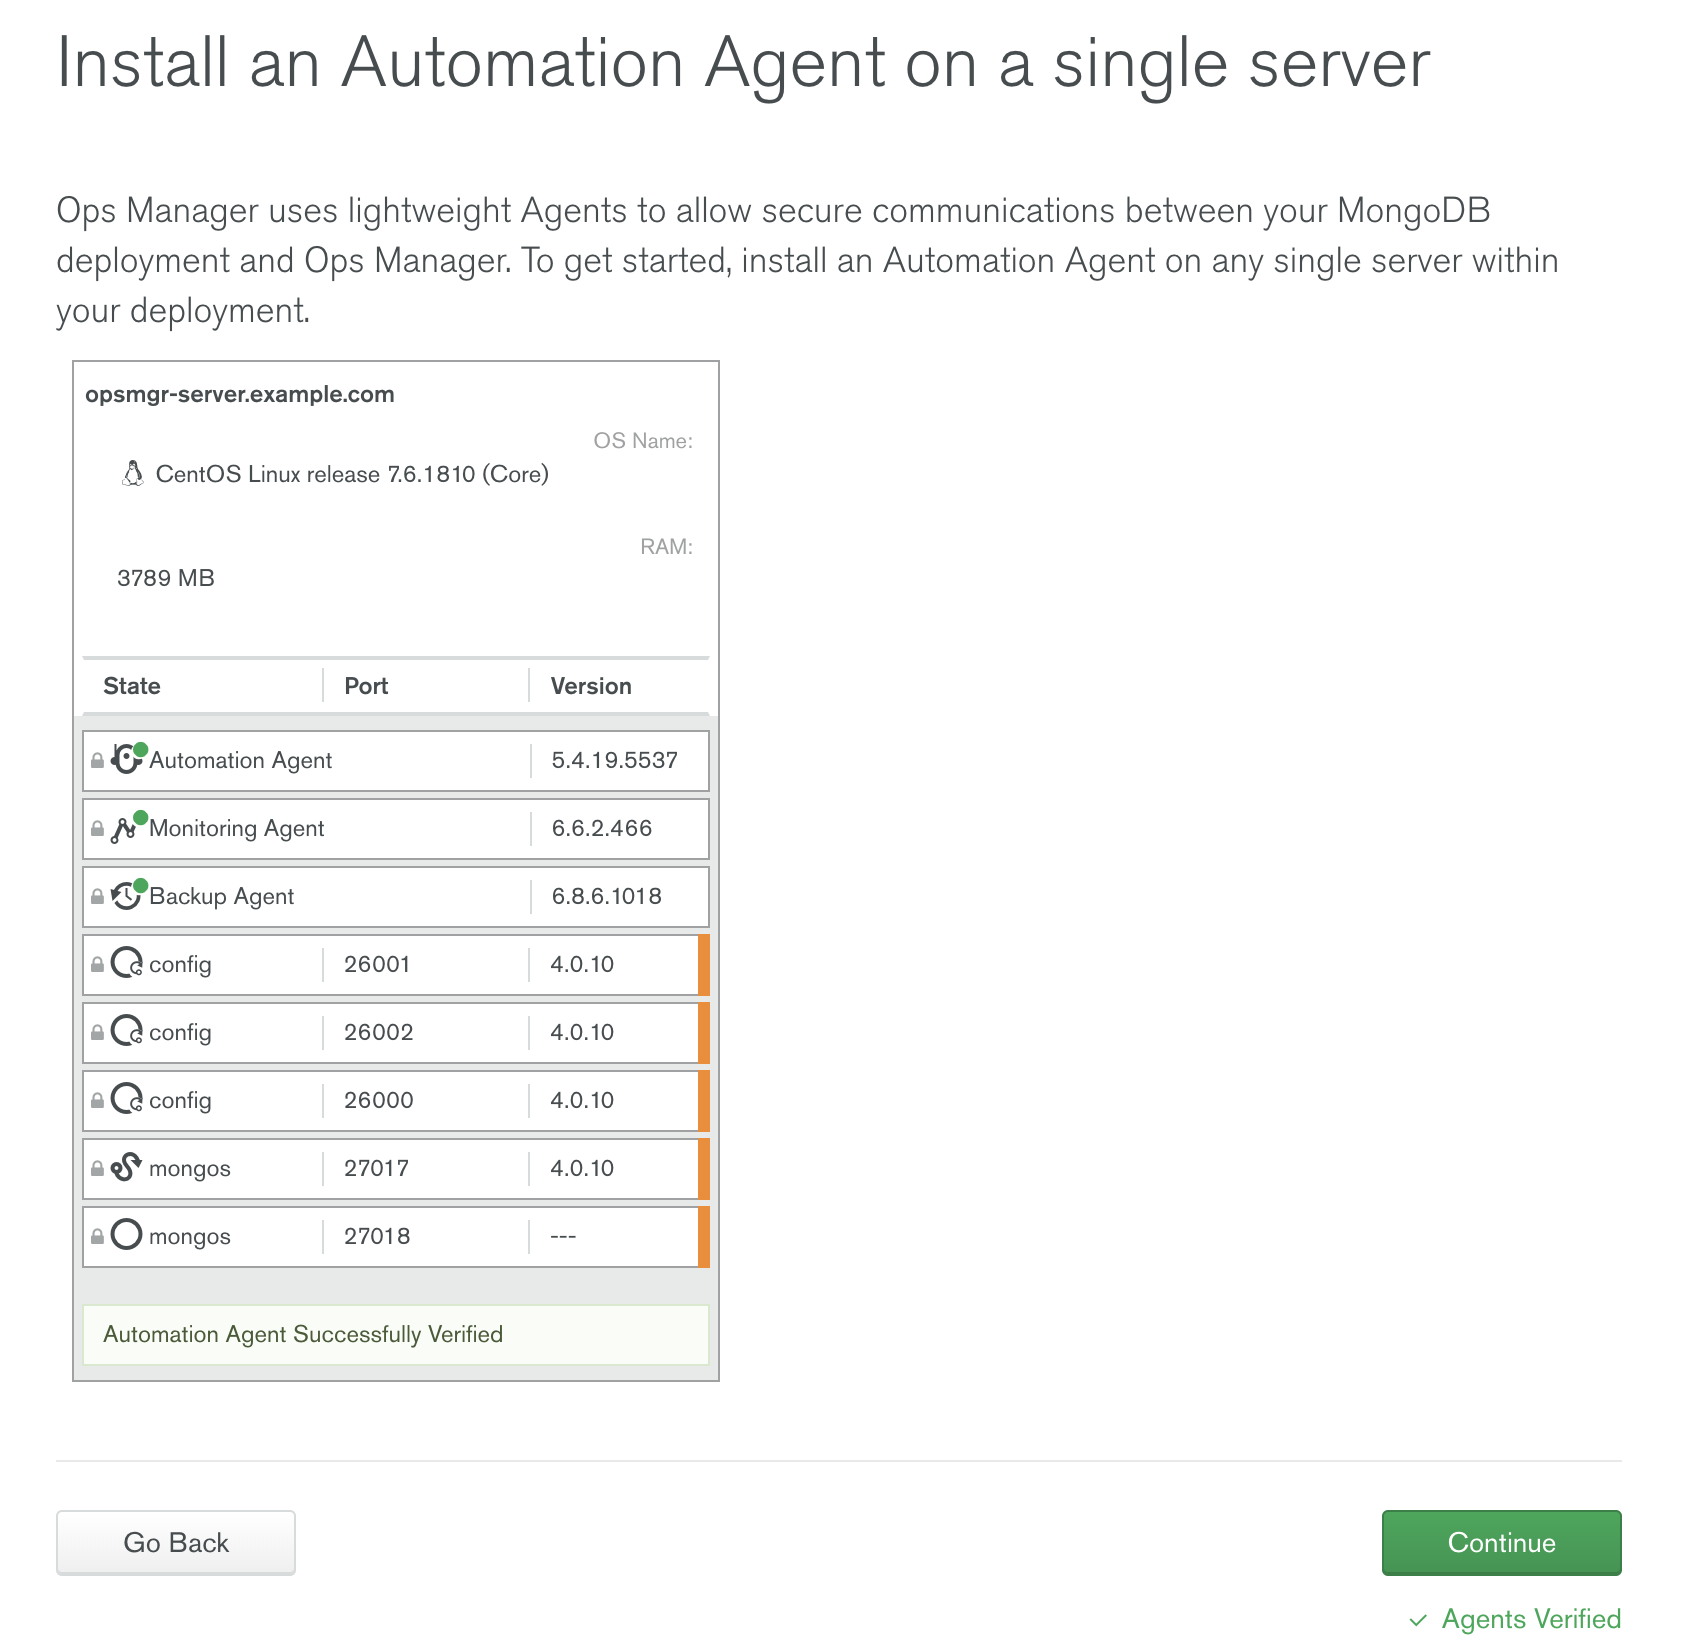
点击继续,进入到 Install an Automation Agent on a single server 界面,在该界面点击 Install Agent 按钮,根据弹出的说明步骤配置一个 Automation Agent, 配置成功后界面如下界面如下
-
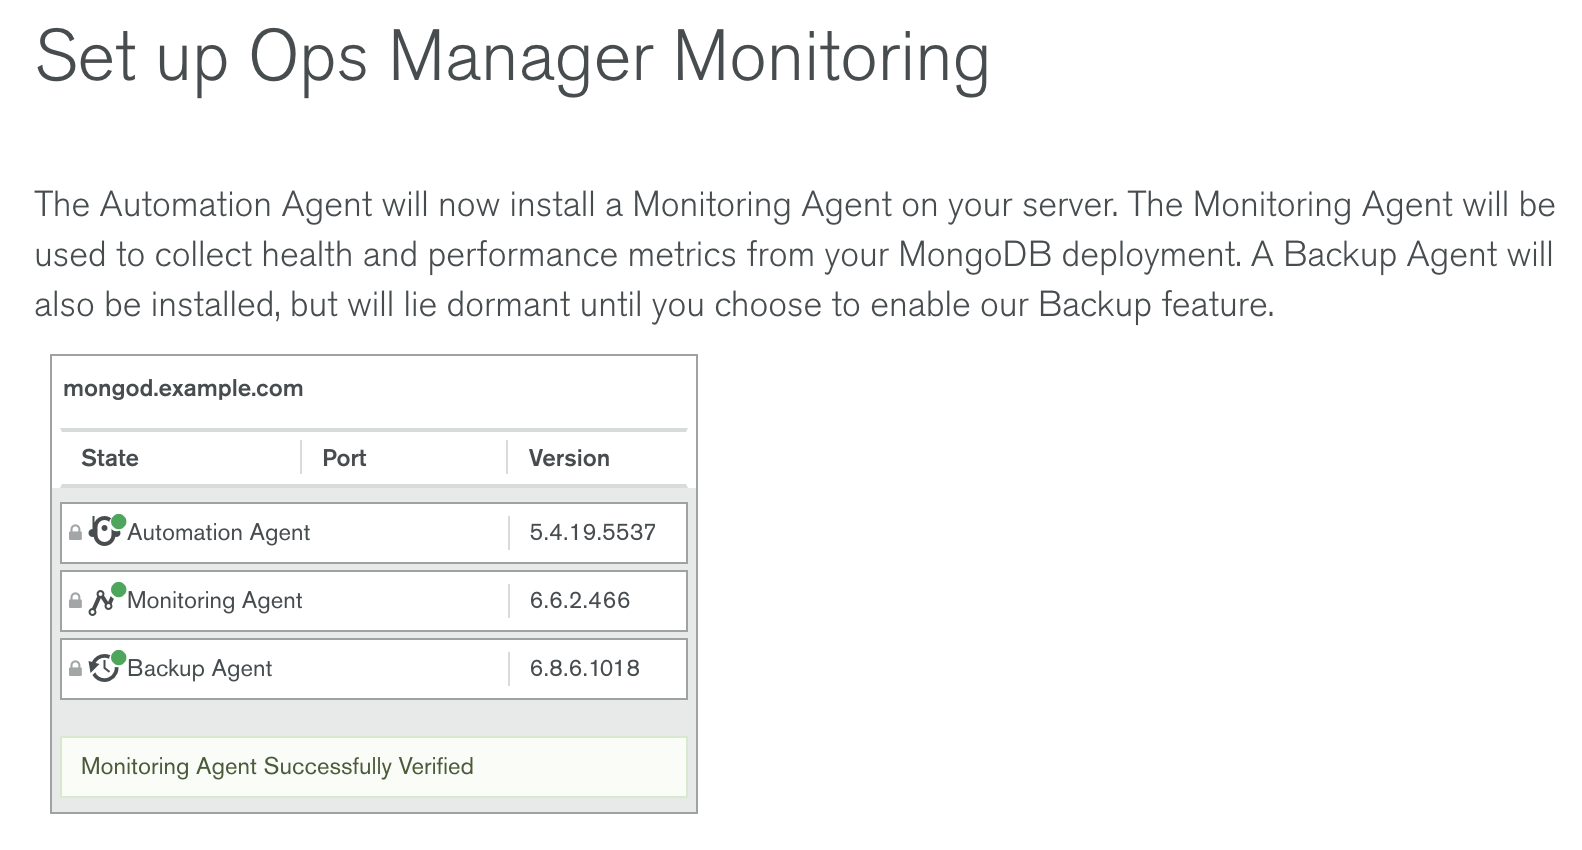
点击继续进入到 Set up Ops Manager Monitoring 界面,Automation Agent 会自动安装 Monitoring Agent 和 Backup Agent,安装完成后界面如下
-
点击继续,进入到 Import your deployment for monitoring 界面输入相应的值
Hostname              -  192.168.33.101
Port                  -  27017
Enable Authentication -  Yes
Username              -  mms-monitoring-agent
Password              -  mongo
-
点击继续,导入界面开始 ping 操作,执行成功后,会有如下输出界面

-
点击继续,进入 Adding your deployment to Ops Manager 界面,会检测到导入的 Server 如下
-
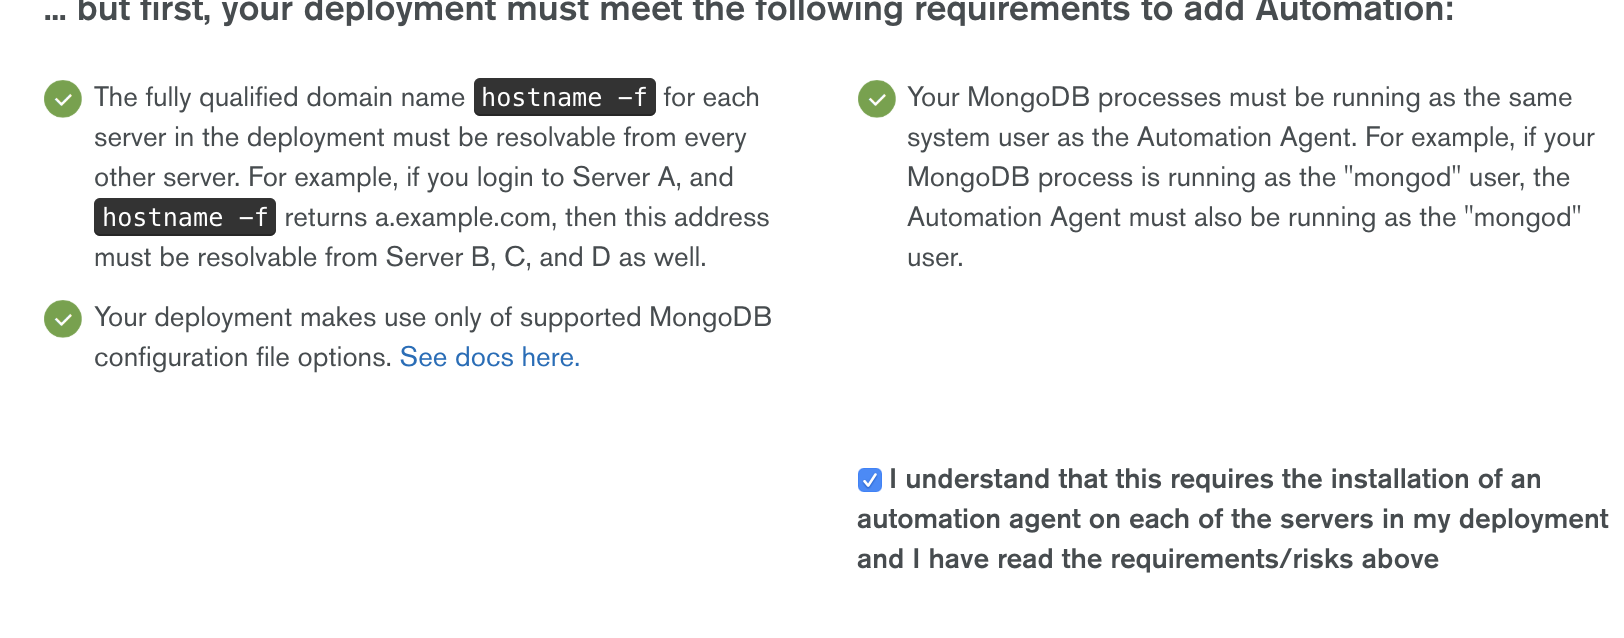
点击继续,进入到 Do you want to add Ops Manager Automation to this deployment? 页面
在页面的底部,选择接受 I understand that this requires the installation of an automation agent on each of the servers in my deployment and I have read the requirements/risks above,
-
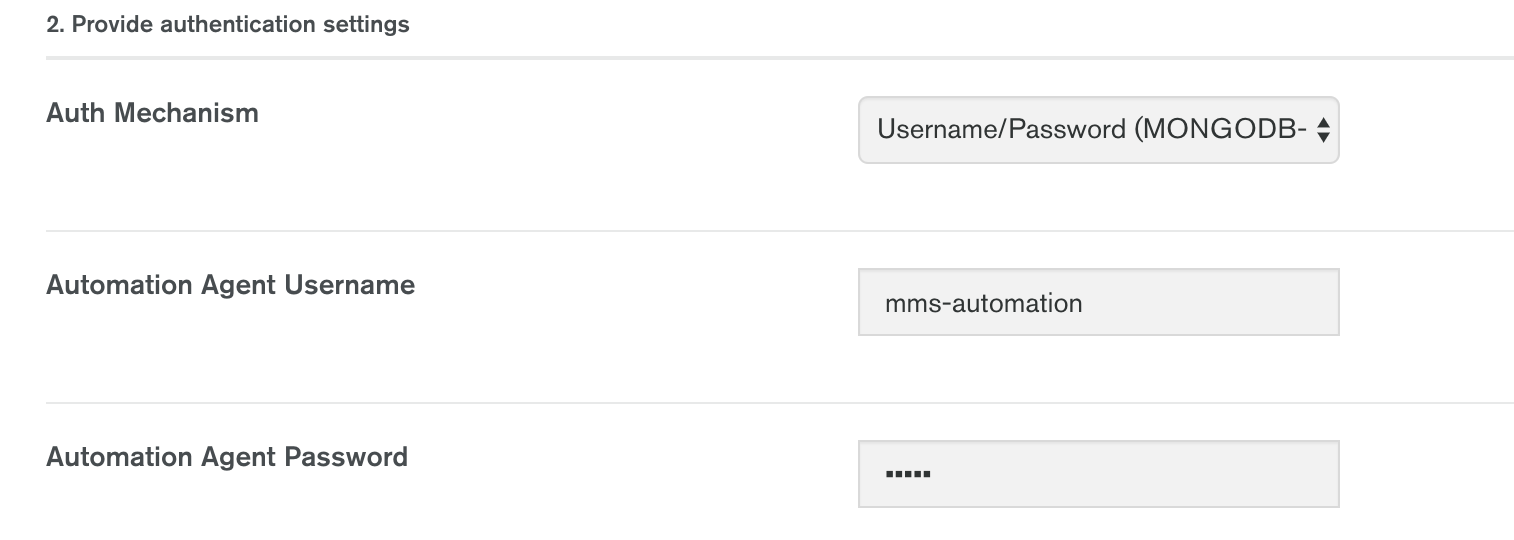
点击继续,进入到 * Configure authentication for Automation* 页面
根据页面的提示,在集群中的所有分片复制集,ConfigServer 复制集合中执行如下命令创建一个用户:
use admin
db.createUser({user: 'mms-automation', pwd: 'mongo', roles: ['clusterAdmin', 'dbAdminAnyDatabase', 'readWriteAnyDatabase', 'restore', 'userAdminAnyDatabase']})
然后在 Provide authentication settings 部分输入上面创建的用户
-
点击继续,进入到 Install an Automation Agent on each of your servers 页面
确保所有的界面上都安装了 Agent。
完成后点击 Initialize Automation 按钮,会进入到 Initializing Automation for your Deployment 页面,收集信息完成后,会有如下输出

-
点击 Review Deployment 按钮,进入到 Deployment 界面
点击 Deployment 界面上端黄色背景横条中 REVIEW & DEPLOY 按钮,Review 相关的变化,

Review 完成后点击 Confirm & Deploy 按钮。
-
导入成功后,在 Cluster_0 中会有 2 个分片,3 个 CONFIGS,连个 mongos

Ops Manager 自动化管理
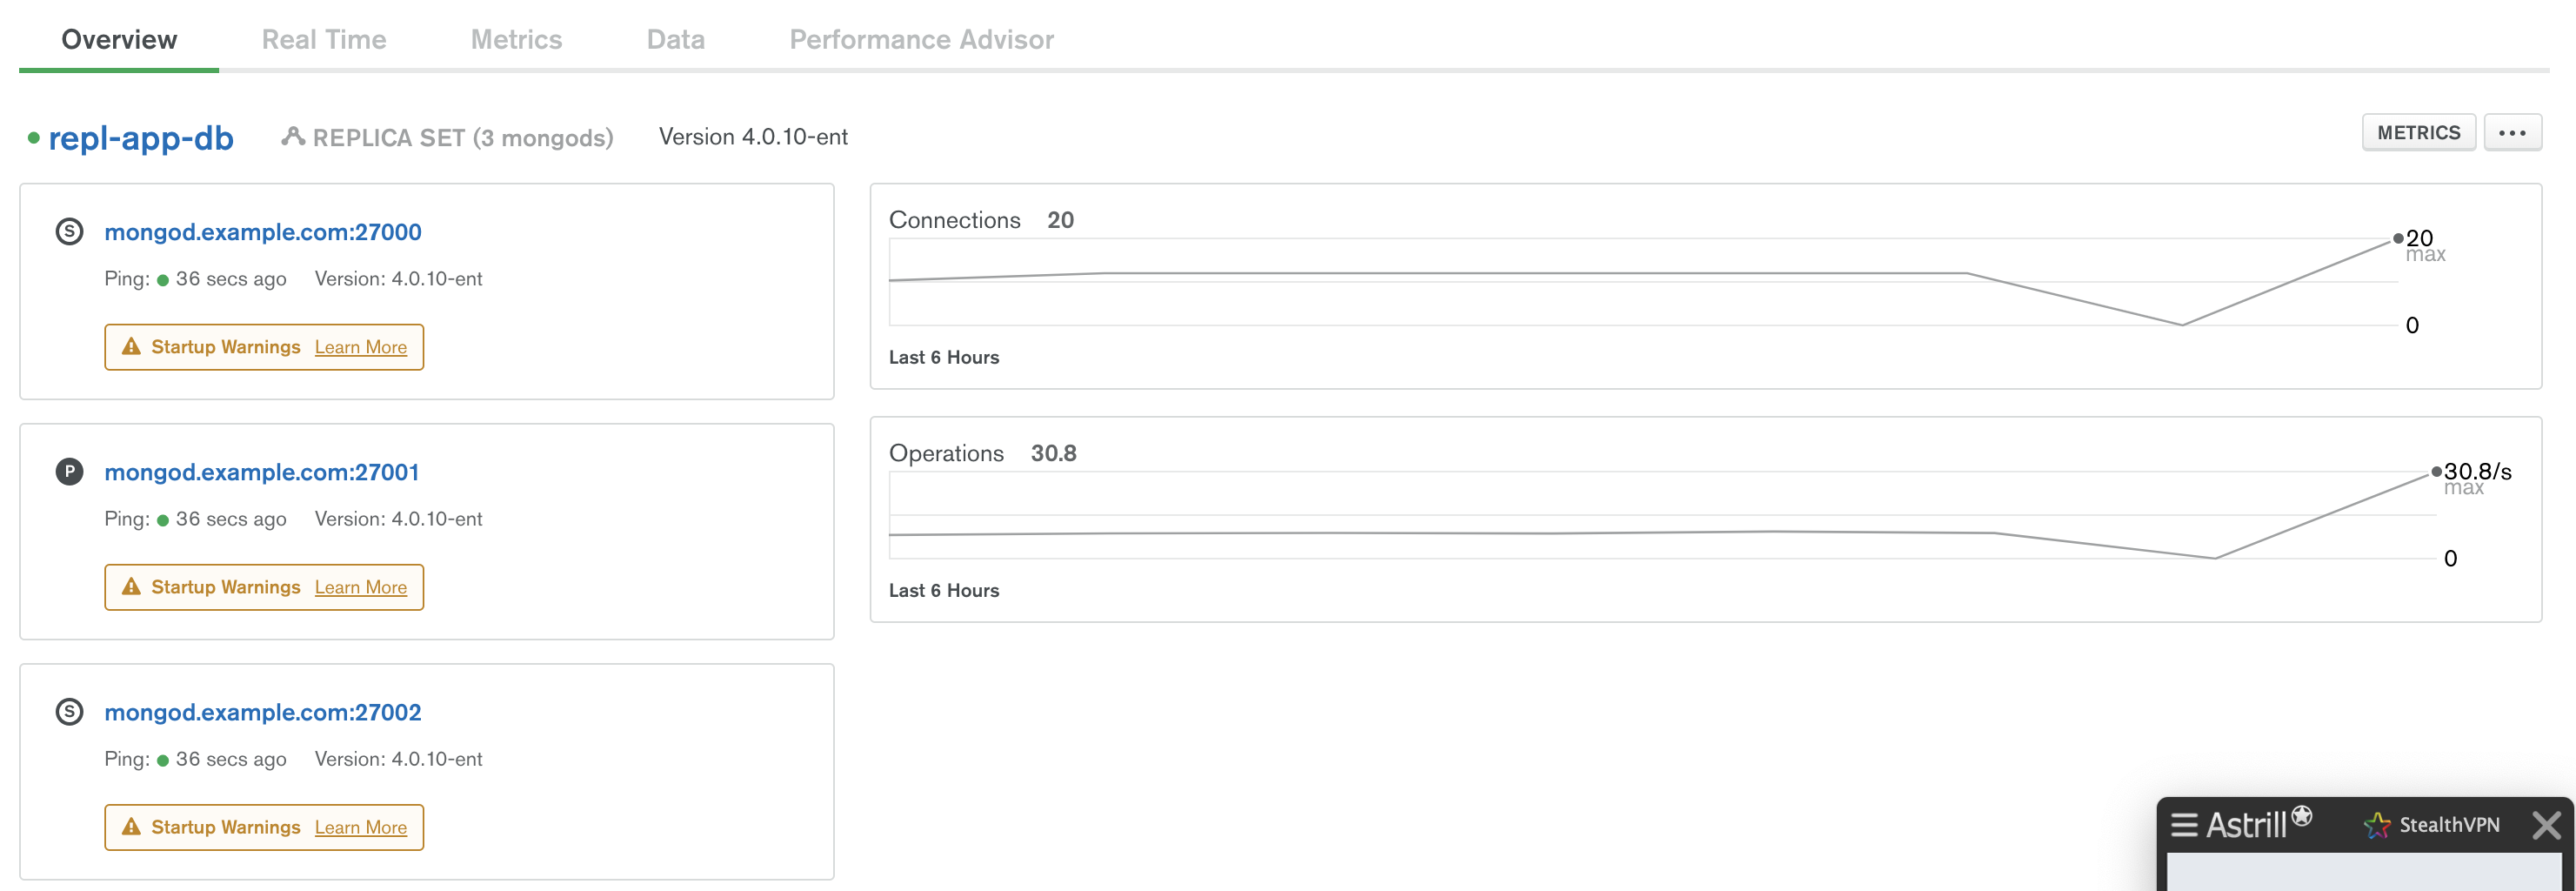
Overview
在部署完成界面,如果点击某一个复制集,会进入到 Overview 界面,该界面下会有整体概述界面
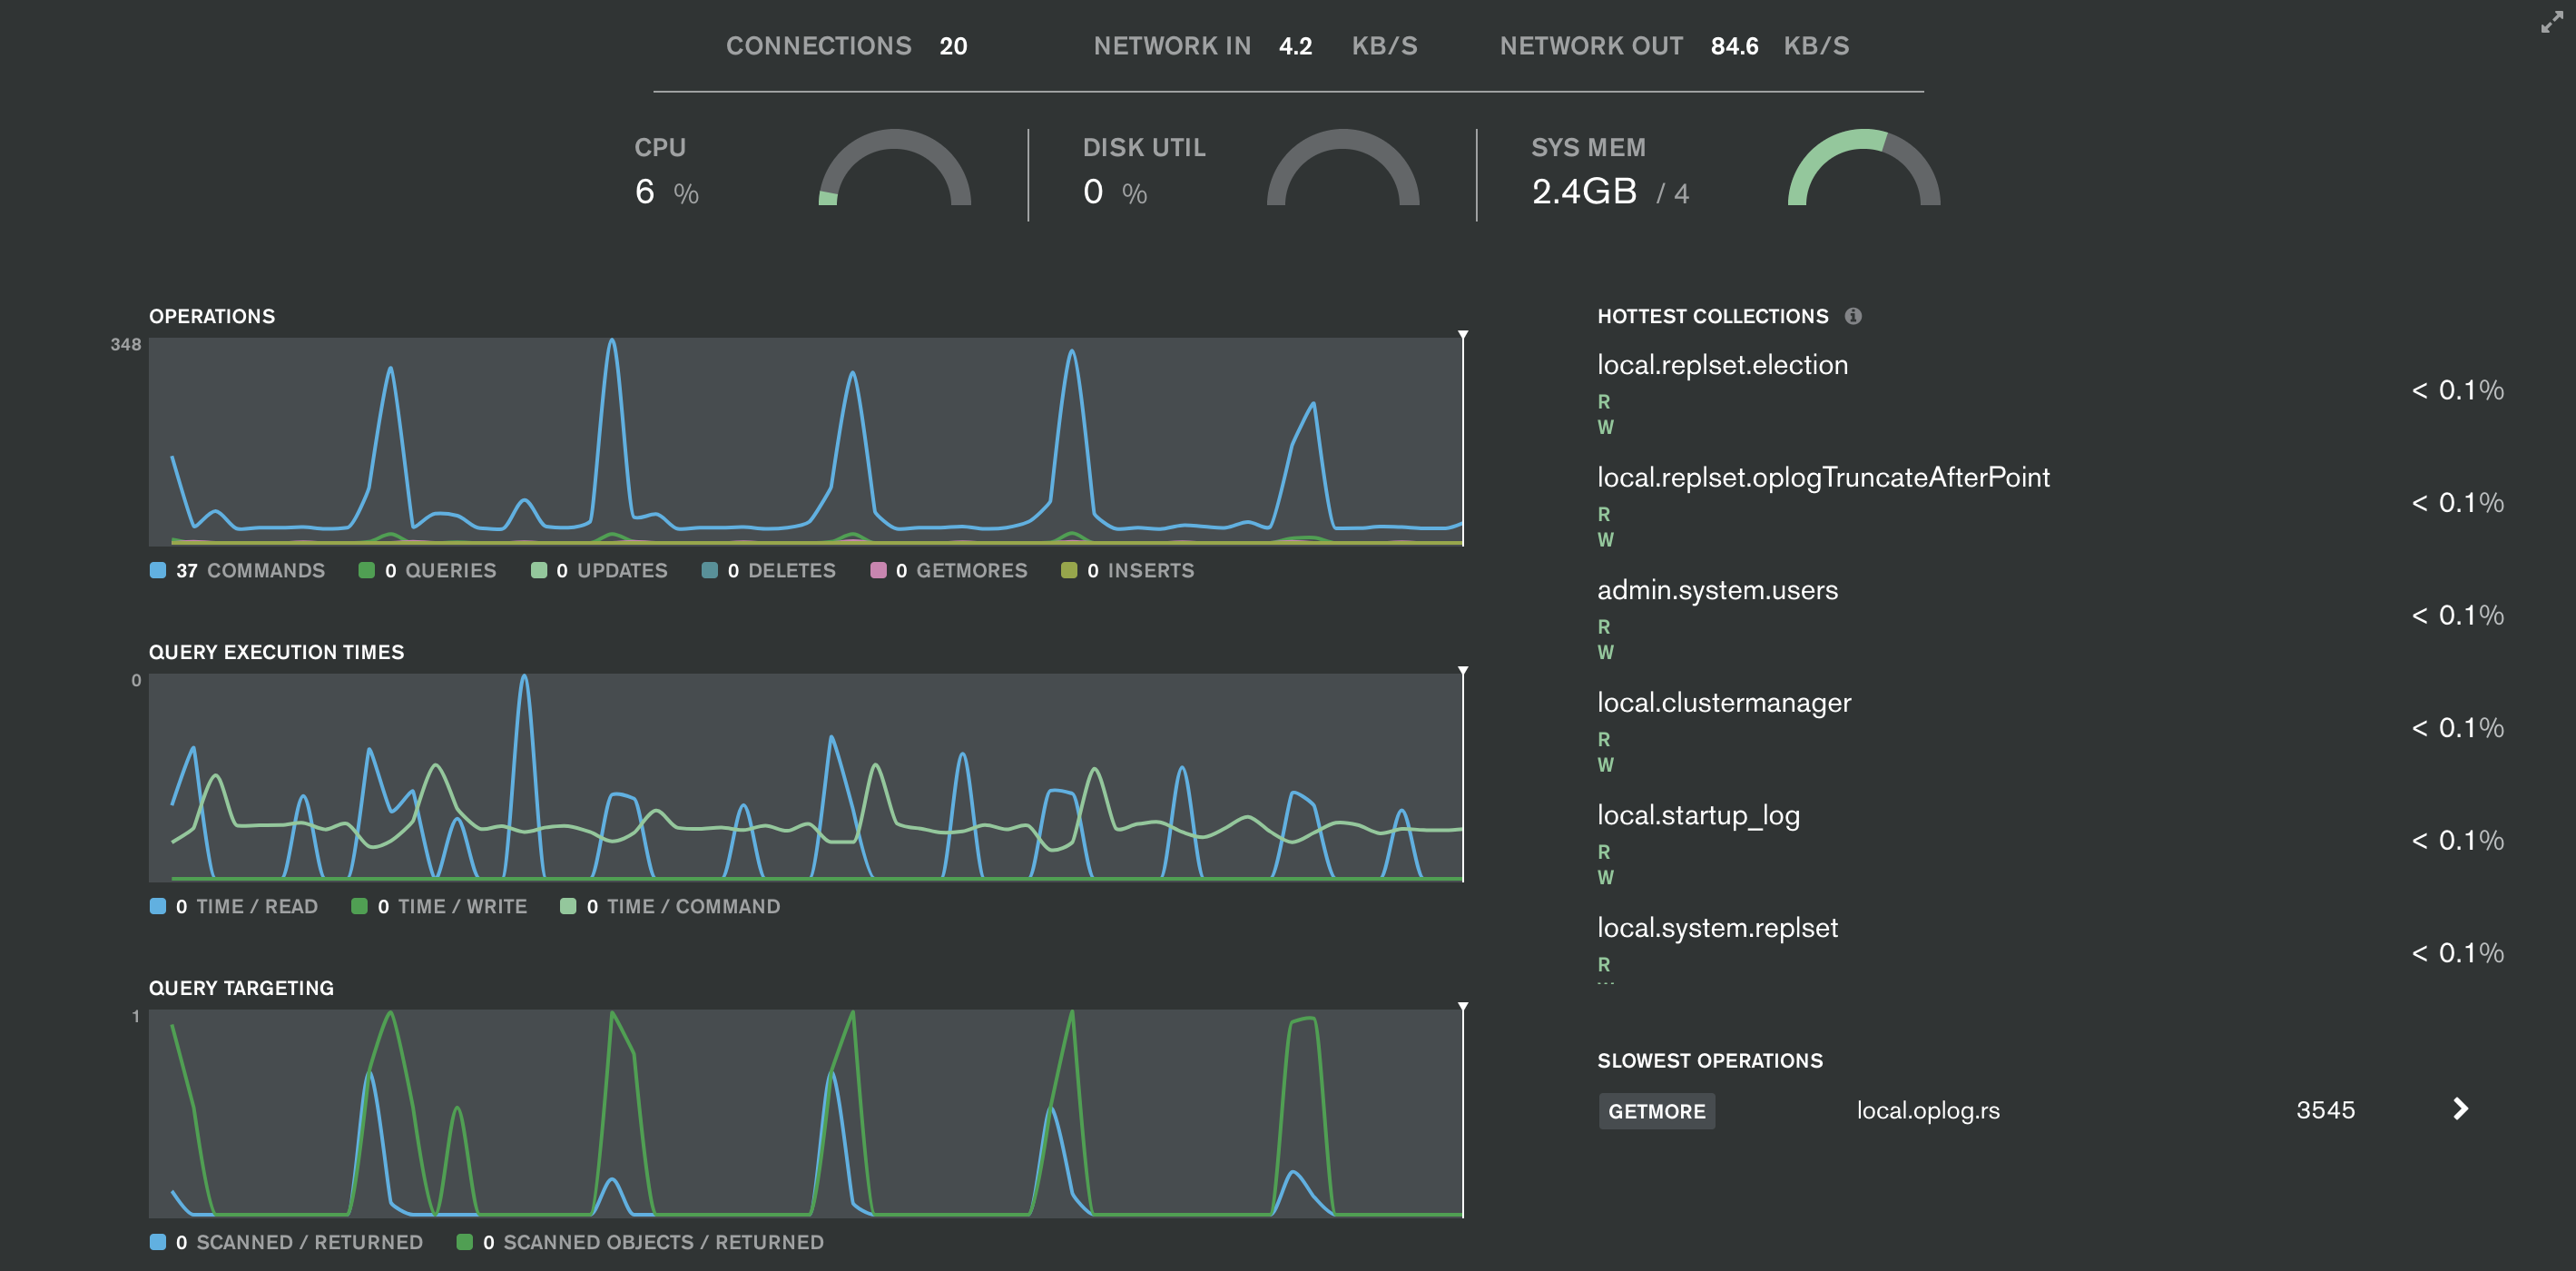
Real Time
该界面下会有实时的监控数据,监控项目主要有 4 个种类
-
系统相关: CPU、磁盘使用率、系统内存、连接总数、网路进出等
-
MongoDB 监控指标: OPERATIONS、QUERY EXECUTION TIMES、QUERY TARGETING、READS & WRITES
-
最高负载的集合,主要从读写两个方面去衡量负载
-
慢操作
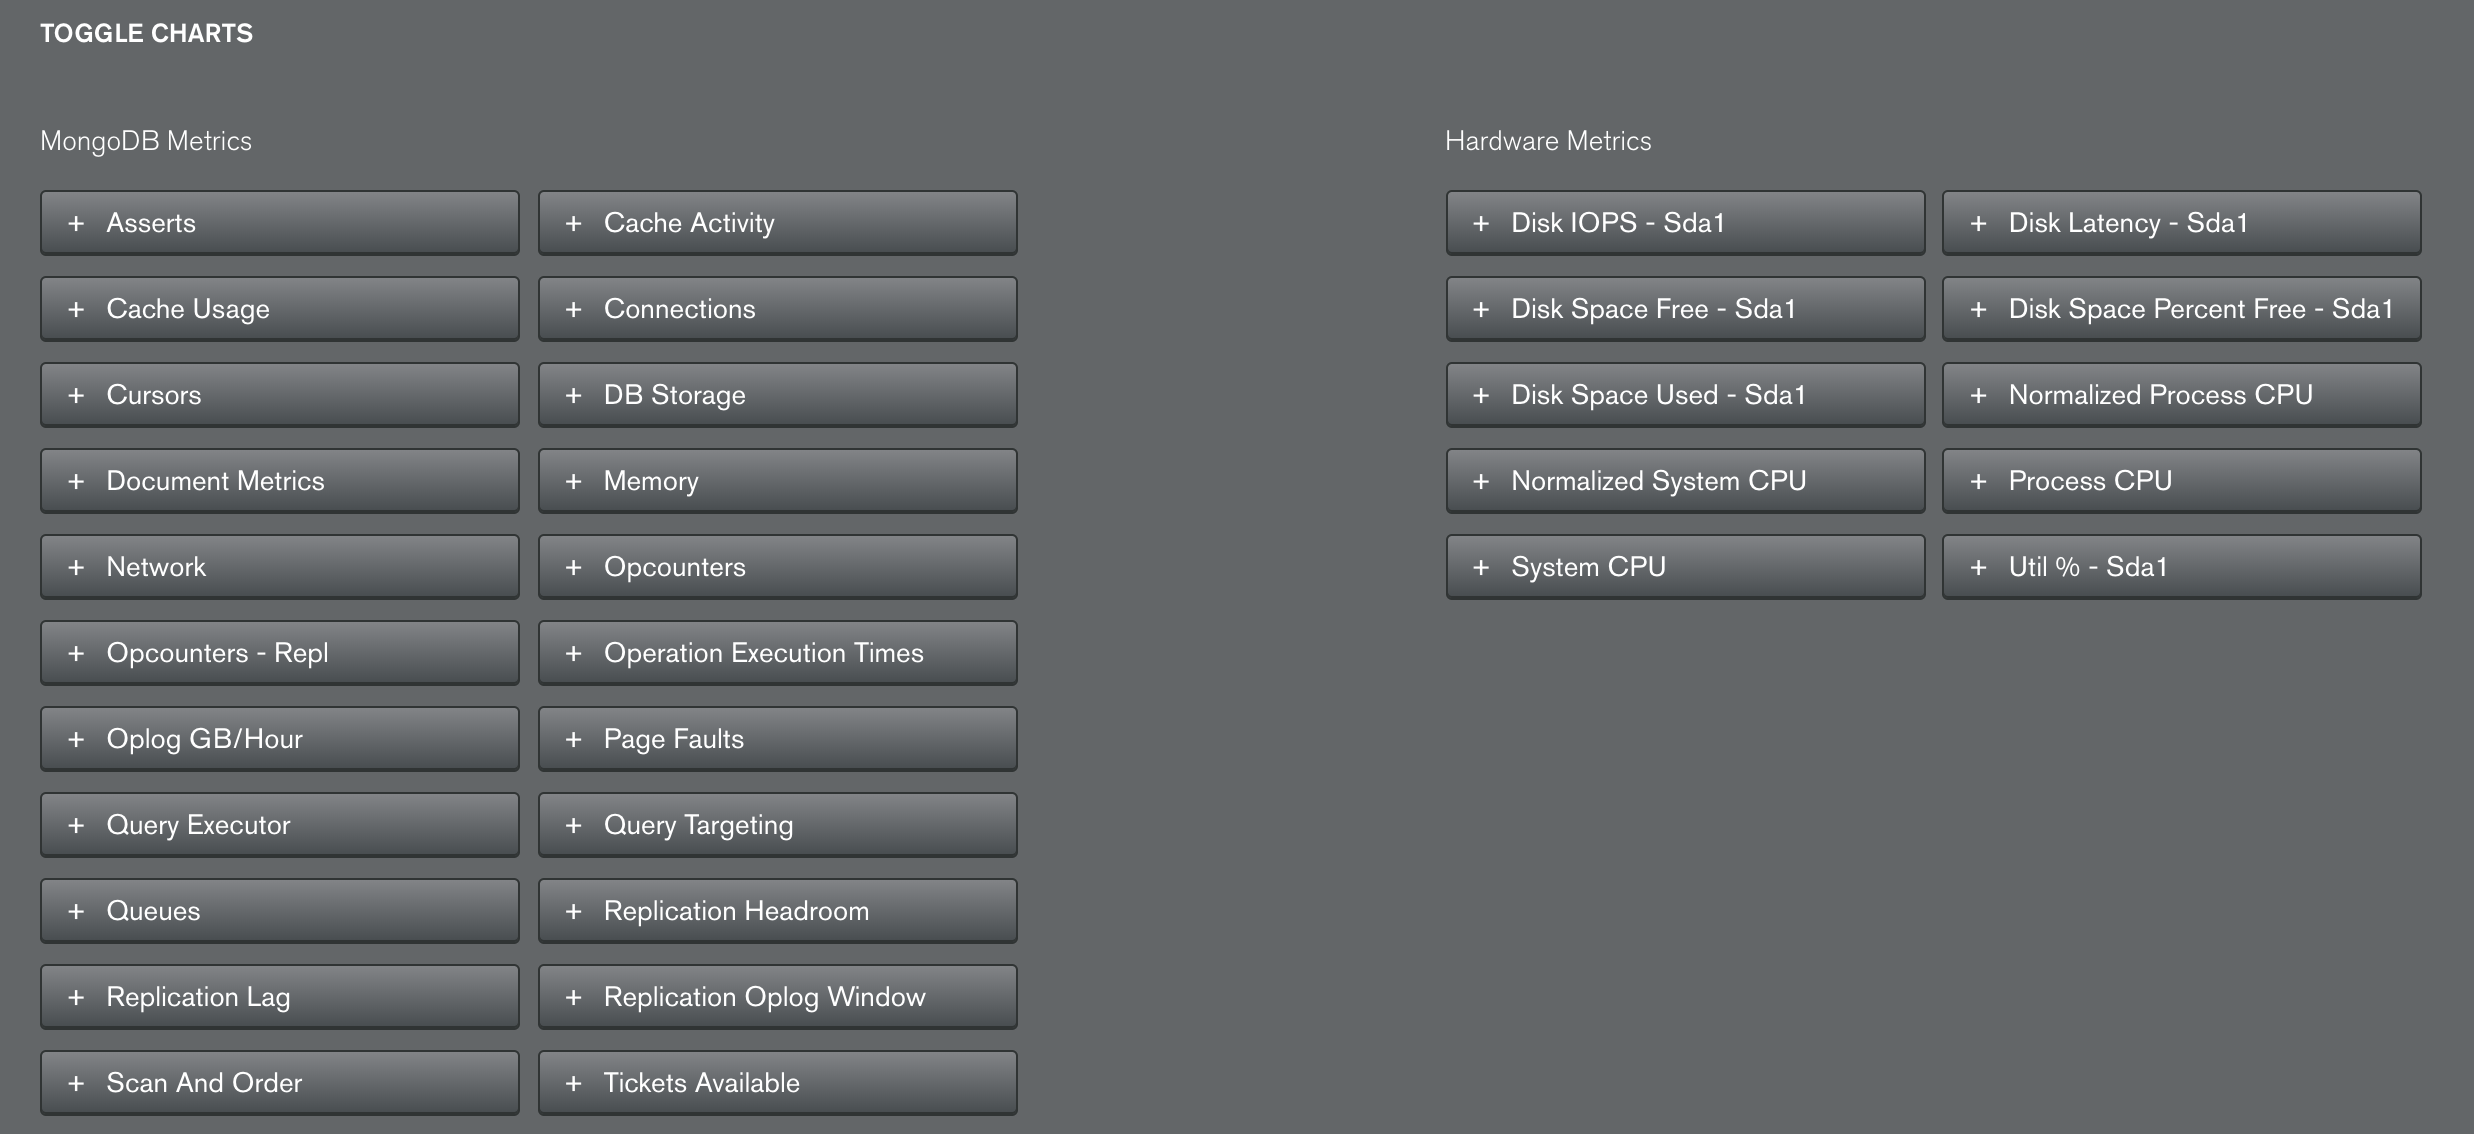
Metrics
可以根据不同的时间间隔,收集一些监控项目,具体监控项有 30 多种,分为两类,即系统相关,和 MongoDB 相关,选择任意一个监控项,对应的监控报表会显示出来
Data
在该界面点击 Create Database 可以创建一个数据库
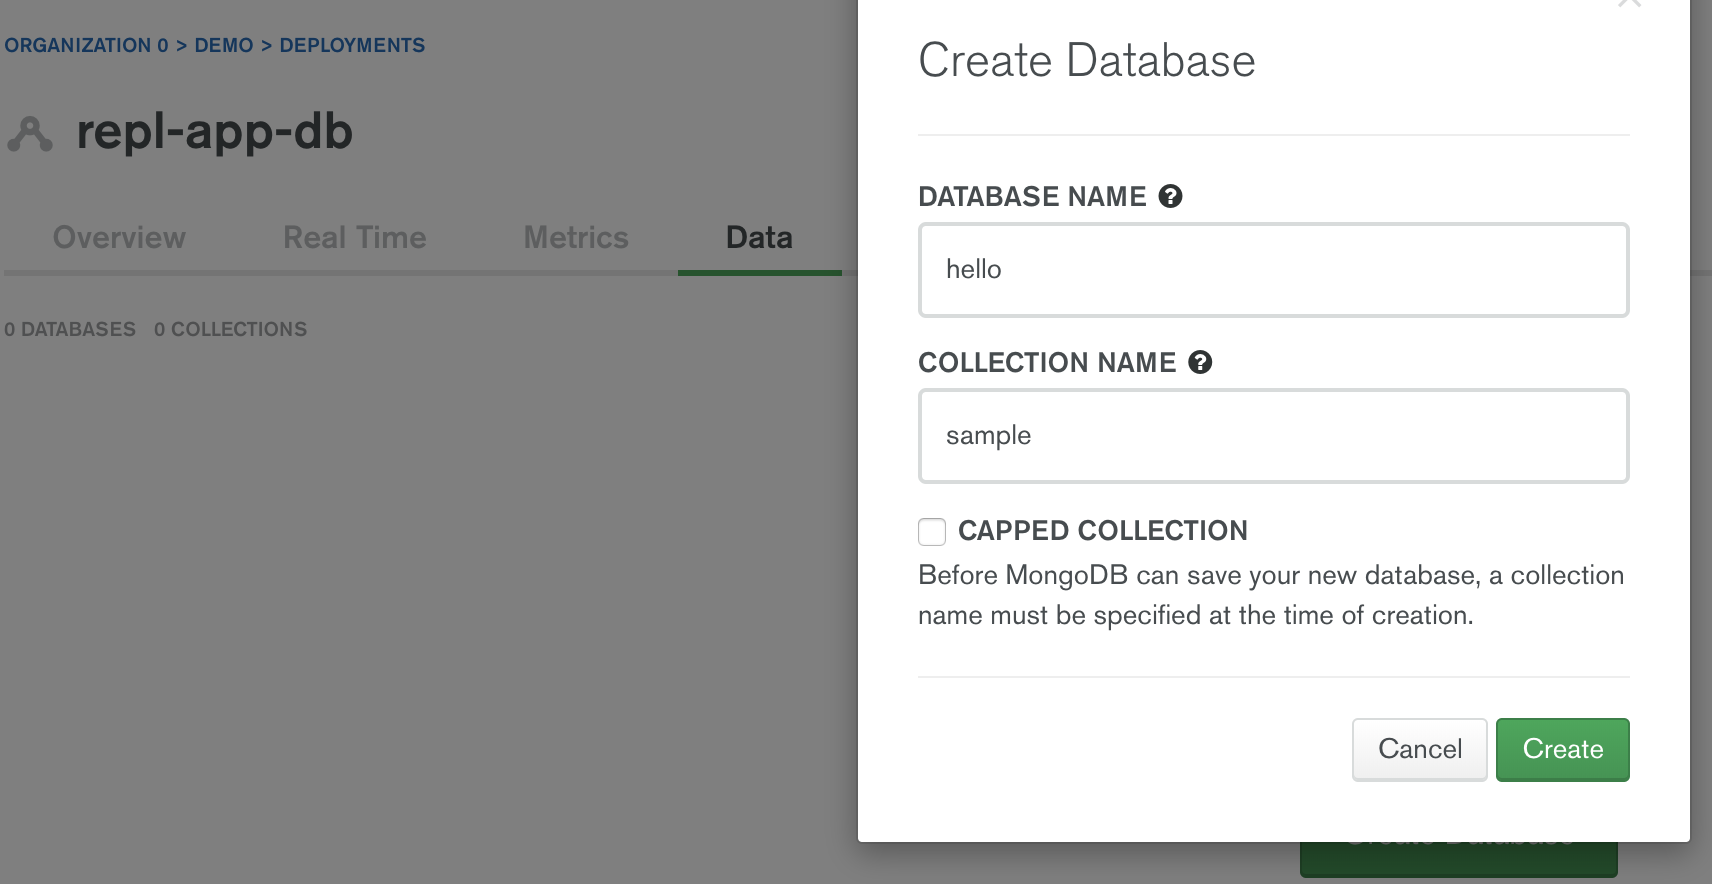
同样在该界面如果选定一个数据库中的集合,可以创建文档。

Performance Advisor
该页面会列出一定时间段内 Ops Manager 检测到的慢查询。
TODO
**
**
**